
Jian Shui Pottery Introduction and Background:
In this article we go through the 13-step process that has been used for centuries to produce Jian Shui Pottery. But before we get into that here’s some background information about Jian Shui pottery.
The history of Jian Shui purple pottery, which is also known as Southern Yunnan red jade, goes back hundreds of years. During the Song dynasty it was celadon; during the Yuan it was blue and white ceramics; during the Ming it was coarse ceramics; during the Qing it was Jian Shui purple pottery. Today, it is considered to be among the four famous types of Chinese pottery and represents the traditional folk art of Yunnan’s Jian Shui county.

Jian Shui purple pottery takes advantage of rich and unique local deposits of red, yellow, purple, cyan, and white 5-color clay.
It applies multiple hand techniques including filled engraving, broken tablet style, and glazeless polish. No external or internal glaze is applied. Instead, meticulous polishing with local river rocks which are just a bit harder than the pottery gives the pottery its unique character and lovely finish. The pieces are described as having “body like iron, color like copper, reflection like a mirror, and sound like a chime.” They possess their own antique character that sets them apart from other types of pottery and places them in the class of exceptional pottery.
The unique glazeless polish ensures the all types of Jianshui purple pottery are acid resistant, alkali corrosion resistant, breathable, moisture resistant, and insulated.
Another advantage of Jian Shui pottery is the use of Hong He county’s relatively un-tapped clays which when fired are more than twice as dense (and heavy) as Yixing clays. These clays are also extremely pure and unadulterated by pollutants.
1. Clay Selections
In the region of Jian Shui there is a place known as “five colors mountain”, this place produces five colors of clay (red, yellow, cyan, purple, and white).
(below: the raw unadulterated ore just after mining)

2. Breaking and Blending the Clay
After the clay maker collects all the ore and crushes them into powder it will be blended with different proportions to get the desired colors.
(below: The ore is crushed into a powder for mixing)

Once the clay has been been crushed into a relatively fine powder it is ready to be blended into various recipes. In reality most Jian Shui pottery is a blend of several types of clay. There are several classic recipes that have been developed over the last century that are not only aesthetically pleasing but which also result in structurally sound pottery that can withstand years of use.
(below: a blend fine ore dust after being mixed together according to a classic recipe)

Jian Shui Pottery is represented not only by teapots and vases but also by clay pots used for cooking and decocting Chinese medicinal remedies (“Qi Guo” 汽锅). These mundane uses for Jian Shui Pottery required clay types that could withstand direct contact with fire and flame day in an day out without cracking or breaking.
(below: chicken in herbs, a Jian Shui classic cuisine in a “Qi Guo” 汽锅)

3. Fermenting the Mud
After the ore is broken down and mixed together, it must be soaked in a vat. The wet clay ferments and congeals into the proper consistency over time. The clay maker has to continuously stir the clay inside the vat and skims out the coarse mud that comes to the top after stirring for awhile. The clay sits in the vat overnight and the next day the process of stirring and skimming is repeated. After skimming the mud three to four times it should be as refined as toothpaste, then it’s allowed to ferment for several more days to develop an even and consistent texture.
(below: mixed clays fermenting in vats)

4. Kneading the Material
When the material is selected for production, the mud will be taken from the vat and kneaded until (the artisan’s) “back is stiff, and the hand is cramped”. This kneading process is important to create a uniform density in the clay by pushing the out all the air bubbles. Once the clay has been properly kneaded to the right consistency the potter can start crafting the pottery with confidence that a good result will be obtained.
(below: kneading process done by hand)


5. Molding (or Throwing)
After kneading the material is ready for molding. The clay is put on a potter’s wheel and “thrown”. This process is not much different than the technique used by potters around the world. However, “molding” requires great skill to achieve the desired shape and symmetry.
(below: the pot is molded into the desired shape on the potter’s wheel)


6. Painting on the Pottery
After molding is complete the pot is allowed to dry for a few days to prepare it for painting and calligraphy. This stage is often accomplished by famous calligraphers and painters. Typically when a vase or teapot is being sold to collectors both the name of the artist who molded or shaped the piece is mentioned and most definitely the name of the calligrapher or artist who embellished the piece with their unique calligraphy or motif. It is extremely hard to paint on Jian Shui clay, because the raw clay is very smooth so the ink needs to be applied in just the right amount because it is easily absorbed. If too much ink is applied the clay will absorb the ink and become stained, rendering the piece unusable. Secondly, doing calligraphy or painting on a curved and multi-faceted piece is very difficult. A great master takes into account the curvature of the piece when the design and arrangement is rendered. To make a truly refined piece, a master has to combine the calligraphy (or painting) and the shape of the ware perfectly. There are very few who can do this, and even fewer who can do it well.

7. Carving With Precision
After the pottery has been painted it’s time to carve out the painted areas. The carving can only be done once, so the master in charge of this process must have a steady, and resolute hand to achieve good results.
The master carver’s task is exceedingly difficult. Carving out complex images and characters is not like writing on a piece of paper which one could do under the influence of alcohol and eating tofu (eating with one hand, and writing with the other)! jk


The master carver is scrupulous and bold, their carving knife moves with fluidity as if supported by the eight immortals themselves!
If you aren’t patient and meticulous you can’t do this carving work. Those who paint and do calligraphy on the Jian Shui pottery can drink and be merry, it won’t impact their abilities and if they make a mistake it can be erased. Those who do the carving must be sober and have a steady hand and it’s rare that the painter/calligrapher also takes on the task of carving.


8. Decorating with Multi-Color Clay Slip Inlay
Now that the design has been carved out, the process of inlaying the multi-colored clay slip into the carved openings begins. This is a laborious process since it must be put in, pressed in, rubbed and then repeated until the slip inlay density is similar the density of pot or vase. The clay must also be flush with the edges achieving a seamless look and feel to it. The clay used for the slip inlay has five different base colors that are mixed into the desired colors. The clay used is the raw not yet fermented (sheng pi) Jian Shui clay. Using this clay allows the more refined “fermented” clay to bond with it. Traditionally Jian Shui pottery clay was purple or red style with the slip inlay being white Jian Shui clay. This white on red look was thought to be the perfect contrast of colors.
(below: traditional inlay on red clay)

Nowadays, multicolored clays are both natural and readily available, so many-hued motifs are possible (with alot of painstaking detail)! In many cases the painter has created a motif that was meant to be done in stages, painting, carving, slip inlay, and then back to the painter for the next stage of the motif’s creation.


9. Refining the Slip Inlay and Final Adjustments
After the slip inlay has been completed, the outer part of the pot or vase needs to be worked over to make the inlay colors flush with main body. This is achieved in two ways, one or both are typically utilized. The first method is to put the pot back on the wheel and turn it again bring the shape back to it and affix the inlaid slip clays. The artisan applies pressure to the outer surface of the pot pushing the slip (sometimes by hand, sometimes with a tool) inlay into the main body and fusing them together further so that during the firing process there won’t be any separation. Additionally the pot is polished with a damp cloth or even the hand. Typically the multi-colored slip inlay will streak out during this process, but this will be addressed during the sanding stage.
(below: pushing and pulling to affix the slip inlay)

10. Natural Shade Drying
This stage requires no work from the potter. All that’s needed is to let the pottery sit and dry before it’s loaded into the kiln. Not allowing enough time to dry naturally before firing can increase the possibility of breakage during firing. Depending on the weather and relative humidity, this stage requires 7 to 12 days.
(below: pots shade drying before kiln firing)

11. Kiln Firing
There is a saying “a good pot doesn’t fear the kiln”! Jian Shui kiln firing temperatures are typically 1000 C and above (as high as 1200 C depending on which kiln and what style of pottery will be fired) for 8 to 12 hours. Jian Shui clay is very fine and during the kiln firing will typically contract about 20%. This high contraction rate can cause a deformed shape or breakage during firing. This undesired result can be largely avoided by correctly fermenting and blending the clays from the start. For especially large pieces the success rate (acceptable result with no deformities or breakage) is only about 40%. Imagine working for weeks or months on a piece only to have it break during firing. Jian Shui potters are notoriously even-keeled people who can withstand incredible disappoint without even a hiccup in their work output.
(below: Jian Shui’s famous Dragon Kiln)

12. Cleaning and Sanding Layers
After firing, the pottery has taken on a rough almost metallic color and feel. This is the stage where sandpaper or other sanding tools are used to remove the “outer skin” of the pot to reveal its inner “refined” look. During this stage, a skilled artisan will make sure the most beautiful layer is revealed and that any slip inlaid picture or characters is revealed perfectly as the artist intended.
(below: sanding by hand to expose the inner beauty)

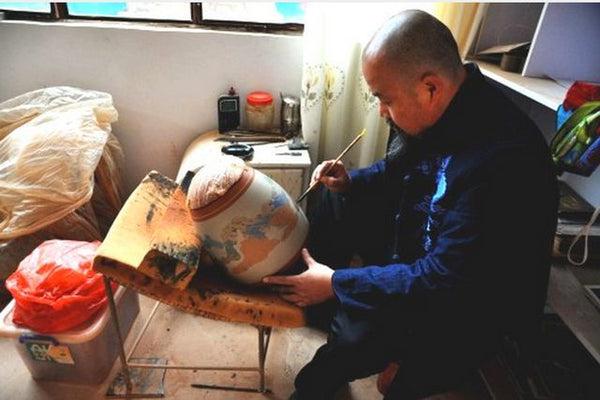
13. Polishing
The Ancients said: “A sword is made by sharpening”, just as Jian Shui pottery is made by polishing. There are two polishing styles; the first is matte polishing, which is a polished but not shiny finish. The second style is shiny and bright. Polishing is done with local Honghe River (Red River) stones. For polishing a vase or other round pottery, the piece is put on the potter’s wheel and fixed there using a soft clay base. The wheel is turned and the artisan will hold the polishing stones in their hands to polish the piece. This requires a huge amount of skill, needing the right application of pressure and even distribution of polishing. For teapots the process of polishing can’t be done on a wheel and is particularly laborious with alot of room for mistakes. If the polishing stone is mishandled it could chip or crack the hand, spout or edge of the teapot.
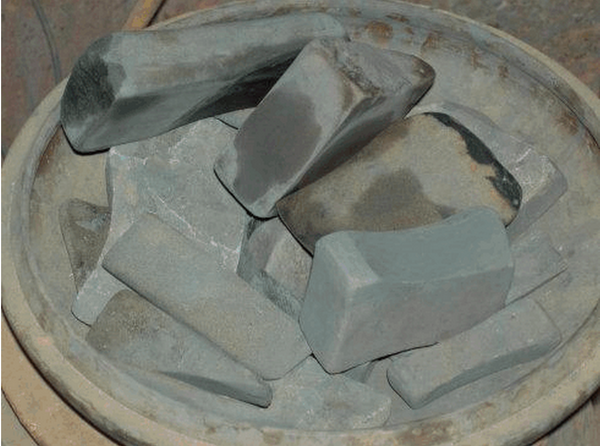
(below: polishing stones after long usage. right: polishing on the wheel)
When the polishing stage is complete the piece is washed and dried. This marks the final stage in long process of creating piece of Jian Shui Pottery. As you can see the process is a refined art form that incorporates the specialized skills of many artisans all working in unison.
Polished Finish Style (Liang Guang 亮光)

Matte Finish Style (Ya Guang 亚光)


